


|

SHARPENING
YOUR IMAGES
An essential step in preparing digital photographs for use is sharpening. A
sharp image has a crisp appearance that’s appealing in most photographs.
Although the sharpness you get is different from what you get from a lens,
you can think of sharpening as digitally focusing your image. In fact, all
digital images can be enhanced by sharpening.

There different forms of sharpening, but they all have in common the
principal of processing an image so that the differences between the pixels
are in some way increased. The software may make the dissimilar pixels less
similar by increasing the contrast between the groups. Because the lines, or
edges of objects in an image tend to be distinguished by such contrast, this
process will tend to enhance the end edges in an image, thus the term
sharpening.
 Raw
digital images–those right out of the camera—often have a tendency to appear
soft. This is due to the technology involved in producing these images.
You'll find that not only do all images need sharpening, but they also need
the right amount of sharpening. Raw
digital images–those right out of the camera—often have a tendency to appear
soft. This is due to the technology involved in producing these images.
You'll find that not only do all images need sharpening, but they also need
the right amount of sharpening.
The basic imaging software that ships with your camera probably has some
form of sharpening as part of an “auto enhance” or “Quick Fix” type of
filter. Automatic software enhancements are designed to allow you to quickly
improve the appearance of most photographs, but lack the controls necessary
to give your photographic eye freedom to get the most from an image.
For most of your images, you’ll find using the
Sharpen filter does a fine job. This effect applies a relatively
even amount of sharpening to your entire image.
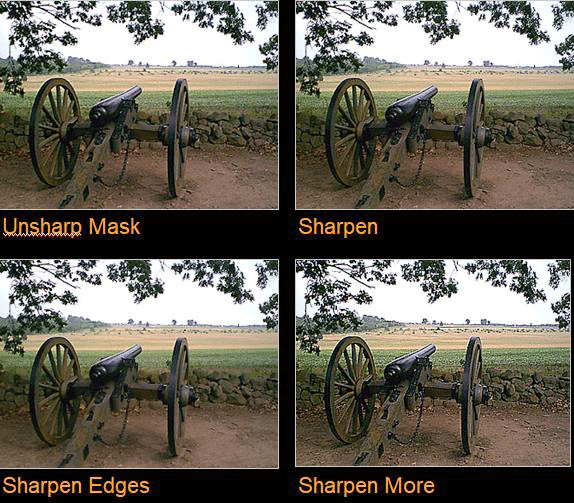
The Sharpen Edges filter is more complex
than the basic Sharpen one. When you apply Sharpen Edges, the software
examines the image for relatively high breaches of contrast, or edges. When
it finds such regions, the software increases the contrast by an appreciable
amount, while it applies less sharpening to areas with less contrast. This
filter can actually make the edges appear to be pronounced in many images,
introducing a new problem.
 Sharpen
More is sort of like apply sharpening edges to the entire image.
This effect will create very high differences in contrast within the
photograph, even those areas were such contrast may not be desirable. Images
that have had the Sharpen More filter applied are usually obvious because of
the grainy appearance typical as a result of using this filter. Sharpen
More is sort of like apply sharpening edges to the entire image.
This effect will create very high differences in contrast within the
photograph, even those areas were such contrast may not be desirable. Images
that have had the Sharpen More filter applied are usually obvious because of
the grainy appearance typical as a result of using this filter.
Despite its name, Unsharp Mask is really
the general form of sharpening–the other three effects being just specific
cases of the UnSharp Mask. Using this filter effectively can take some
practice, but once you’re comfortable with Unsharp Mask, you'll almost never
use any other form of sharpening. When you open up this filter, you'll see a
small preview of your image. You can use this preview to get an estimate of
the effect your choices will have on the appearance of your photograph.
The main options offered under Unsharp Mask are Amount,
Radius, and Threshold. Amount is a
percentage change you wish to apply to those pixels that are selected for
sharpening. Radius is the number of pixels out from the selected
pixel to apply the percentage of sharpening you’ve selected in the Amount
option. And Threshold is the level of brightness that will be used to
discriminate those pixels selected for sharpening.
Above all, never set any of the above sharpening tools at 100 percent. Set
the percentage of sharpening to say 75 or 50 percent. If the resulting
effect isn’t sharp enough, you can always sharpen again at the lower
percentage.
|